Infrared heater mounting height makes a bigger difference than most people expect. You can buy a strong patio or garage heater, install it in the wrong spot, and still end up wondering why the heat feels weak, patchy, or strangely harsh.
That’s where people get tripped up. One brand says 6 to 9 feet. Another says 8 to 12. Then you start seeing advice about tilt angle, spacing, wind, ceiling joists, and line of sight — and suddenly a simple install starts feeling much more complicated than it should.
The good news is that heater placement gets easier once you stop thinking about heating the whole air and start thinking about where the radiant heat is pointed. Infrared heaters warm people, floors, furniture, benches, and surfaces directly. So if the unit is too high, too flat, or aimed at empty space, you’ll notice it fast.
This guide breaks down the part people actually struggle with: infrared heater mounting height. We’ll cover the height ranges that usually work best, how angle changes coverage, when wall mounting beats ceiling mounting, and the mistakes that waste heat.
Why infrared heater mounting height matters
Infrared heaters don’t work like forced-air heaters. They don’t mainly warm the air and hope that warm air drifts where you need it. They send radiant heat in a direction — more like sunlight than a fan heater.
That changes the whole setup.
If the heater is mounted too high, the warmth loses intensity before it reaches people below. If it’s mounted too low, the heat can feel too aggressive in one spot while missing the rest of the area. And if the angle is wrong, the heater may end up warming a wall, walkway, or empty patch of concrete instead of the seating area or work zone you actually care about.
That’s why this isn’t just a safety issue. It’s a comfort issue too.
A simple way to think about it:
- Higher mount = wider coverage, lower intensity
- Lower mount = stronger intensity, narrower coverage
That balance is what you’re trying to get right.
Quick mounting height guide
Here’s the fast version before we get into the details:
| Setup | Typical Mounting Height | Best Use | Notes |
|---|---|---|---|
| Small electric patio heater | 6–8 ft | Balconies, compact covered patios, seating zones | Keeps heat feeling stronger and more direct |
| Standard residential patio heater | 7–9 ft | Covered patios, pergolas, outdoor dining | Often the sweet spot for comfort and spread |
| Garage heater with lower ceiling | 7–9 ft | Small garages, workshops, bench areas | Good for stronger heat at working level |
| Garage heater with taller ceiling | 8–12 ft | Two-car garages, shops, larger work zones | Needs enough output to still feel strong |
| Commercial or high-output heater | 10–16 ft | Restaurants, warehouses, industrial areas | Only works well if the heater is built for long throw |
That table is a starting point, not a replacement for the manual. Manufacturer limits always matter more than generic rules.
The best mounting height depends on the kind of heat you want
A lot of people want one perfect number, but it helps more to think about the kind of warmth you’re after.
If you want stronger, more immediate heat
Mount within the lower end of the approved range.
This usually works better for:
- outdoor dining tables
- sofas and lounge seating
- workbenches
- garages where you stand in one main area
- breezier patios where you want the heat to feel stronger
The trade-off is narrower spread. You get more punch, but less blanket-style coverage.
If you want broader, more even coverage
Mount toward the higher end of the approved range.
This usually works better for:
- larger covered patios
- open seating rows
- garages where you move around more
- multi-use spaces where you want softer overall warmth
The trade-off is lower intensity. If the heater isn’t strong enough for that distance, it may feel like it’s on without feeling truly warm.
Ceiling mount vs wall mount
Both can work well. The better choice usually comes down to the layout.
Ceiling mounting
Ceiling mounting is often the easiest way to get broad, even coverage. It keeps the heater out of the way, frees up wall space, and lets the radiant heat spread downward into the part of the space people actually use.
It’s usually the best fit for:
- covered patios
- pergolas
- garages
- workshops
- restaurant seating
- long rectangular layouts
Wall mounting
Wall mounting works well when there’s no overhead structure, when the patio is narrow, or when you want to push heat toward a specific target area like a dining table, sofa, workbench, or garage bay.
It’s often the better fit for:
- balconies
- narrow patios
- garage side walls
- entry seating
- wall-adjacent work zones
Wall-mounted units usually create more directional heat. That can be useful — but it also means placement becomes more sensitive.
| Mounting Style | Pros | Cons |
|---|---|---|
| Ceiling mount | Better overall spread, cleaner look, keeps heater out of the way | Needs overhead structure, may need drop poles or suspension in higher ceilings |
| Wall mount | Good for targeted heat, useful where no ceiling structure exists | Narrower coverage, angle matters more |
Best tilt angle for infrared heaters
Height matters, but angle decides where the heat actually lands.
A heater mounted at the right height can still underperform if the tilt is off.
| Mounting Type | Typical Angle | What It Does |
|---|---|---|
| Ceiling mount | 0°–30° downward | Broader coverage, gentler spread, good for larger zones |
| Wall mount | 15°–45° downward | Pushes heat toward seating or work areas |
| Focused wall setup | 25°–35° downward | Often a practical sweet spot for seating and benches |
And here’s what usually happens when the angle is wrong:
| If the heater is… | You’ll likely notice… | What to do |
|---|---|---|
| Too flat | Heat goes past people or into open space | Increase downward tilt slightly |
| Too steep | One hot spot directly below, weaker edge coverage | Reduce angle for a wider throw |
| Aimed at obstacles | Warm wall, shelf, beam, or plant — but not people | Clear the radiant path or reposition the unit |
In real life, a slight to moderate downward angle usually gives the best balance.
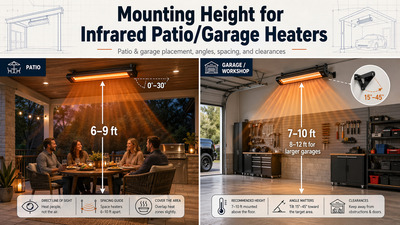
Infrared heater mounting height for patios
Patios are where bad placement becomes obvious fast. You’re usually sitting still, the air is cooler, and even a light breeze can make a weak setup feel worse.
For many residential outdoor heaters, 7 to 9 feet is a very comfortable range. That’s high enough to keep the heater safely overhead, but low enough that the warmth still feels direct.
Patio height ranges that usually work well
| Patio Setup | Recommended Height | Practical Advice |
|---|---|---|
| Small covered patio | 6–8 ft | Good for stronger warmth in compact seating areas |
| Standard pergola or covered patio | 7–9 ft | Often the easiest range to make feel comfortable |
| Open patio with some breeze | Use lower end of allowed range | Helps the heat feel stronger where people sit |
| Large outdoor dining area | 8–10 ft with multiple units | Use overlap instead of relying on one oversized heater |
One patio rule saves a lot of disappointment: don’t aim the heater at open air — aim it at people.
That sounds obvious, but a lot of setups put the heater where it looks best instead of where the warmth needs to land. If your table sits off to one side, your heater placement should reflect that.
Infrared heater mounting height for garages
Garages are different. You often have taller ceilings, colder floors, harder surfaces, and more vertical space to work with.
For many home garages, 7 to 10 feet is the practical range. If the garage is larger or the ceiling is higher, 8 to 12 feet can work well — but only if the heater output matches that distance.
Good garage placement goals
You usually want the heat to reach:
- the workbench area
- the floor near where you stand
- the vehicle bay you actually use
- tools and surfaces that re-radiate warmth back into the space
Garage height guide
| Garage Type | Typical Height | Best Approach |
|---|---|---|
| Small single-car garage | 7–9 ft | Keep heat closer for stronger working comfort |
| Standard two-car garage | 8–10 ft | Good balance of spread and intensity |
| Taller workshop or shop space | 9–12 ft | May need suspension mounting or a stronger heater |
| Very high ceiling | Depends on heater design | Bring the heater lower if allowed instead of losing intensity |
A common mistake is mounting the heater high near the ceiling just because there’s room there. If the unit isn’t designed for that distance, the warmth at floor level can feel disappointingly soft.
How to choose the right mounting height for your setup
The easiest way to figure out infrared heater mounting height is to work backward from the area you want to warm.
Step 1: Check the manual first
Always start with the manufacturer’s minimum and maximum mounting height, plus top, side, and front clearances. That matters more than any generic internet advice.
Step 2: Think about how the space is used
A patio seating area usually needs warmth aimed lower and more directly than a garage where people are moving around. Seated targets often do better with tighter mounting ranges. Standing work areas can usually tolerate a bit more height.
Step 3: Match heater strength to distance
If you’ve got a lower-output electric heater, don’t expect great results from a very high ceiling. Mount it closer within the approved range. Higher-output heaters can sit farther away and still feel strong.
Step 4: Watch the beam path
Shelves, garage door tracks, fans, rafters, plants, and décor can block radiant heat. If something sits in the heater’s line of sight, that object gets warmed first.
A simple test helps here: imagine where the heater is “looking.” That’s where most of the comfort will land.
Spacing multiple heaters for even coverage
Even the right height won’t fix bad spacing.
One heater in the middle of a large patio or garage often creates one good zone and a lot of okay-to-cold edges. Two smaller heaters with slight overlap usually feel better.
| Area Size | Typical Spacing | Coverage Tip |
|---|---|---|
| Small area | 6–8 ft apart | Works for compact seating or single work zones |
| Medium patio or garage | 8–12 ft apart | Good for even coverage with slight overlap |
| Large commercial area | 12–15 ft apart | Depends heavily on heater output and mounting height |
The goal isn’t perfect separation. The goal is slight overlap, so the space doesn’t feel warm in stripes.
Common mistakes that make heaters feel weak
A lot of complaints come back to the same handful of setup mistakes.
Mounting too high because it looks cleaner
This is probably the biggest one. The heater looks tidy, but the warmth loses punch before it reaches the people below.
Aiming at empty space
Infrared is directional. If the heater points at the wrong zone, the wrong zone gets warm.
Ignoring wind outdoors
Infrared handles moving air better than convection heat, but exposed patios still lose comfort faster than covered ones. Breezy spaces often need a lower approved mounting range, better aiming, or more than one heater.
Treating all heaters like they’re equal
A strong commercial gas unit and a smaller residential electric model are not interchangeable. One may perform well at 10 or 12 feet. The other may not.
Guessing on clearances
This is the one you really don’t want to get wrong. Top, side, rear, and front clearance requirements vary by model. Those numbers affect safety, performance, and warranty coverage.
Quick mounting cheat sheet
| If you notice… | The likely cause | Try this |
|---|---|---|
| Heat feels weak | Mounted too high, poor angle, or windy setup | Lower the unit within spec or angle it more directly |
| One area feels too hot | Mounted too low or tilted too steeply | Raise it slightly or flatten the angle a bit |
| Cold spots between heaters | Spacing too wide | Move heaters closer or add slight overlap |
| Walkway is warm, seating is not | Heater aimed at the wrong target | Re-aim toward the occupied zone |
| Garage floor still feels cold | Heater too high or too far from the work zone | Bring heat closer to where you stand and work |
Best practices before you install
Use this checklist before drilling anything:
- read the manual first
- confirm minimum and maximum height
- check ceiling and side clearances
- decide exactly which area you want to warm
- make sure there’s clear line of sight
- think about seated vs standing height
- account for wind on patios
- use multiple heaters for larger spaces instead of relying on one oversized unit
- test the angle before fully locking the brackets in place
Bottom line
The best infrared heater mounting height is the one that gives you enough intensity, enough spread, and enough clearance at the same time. For many patios, that ends up around 7 to 9 feet. For many garages, it’s often 7 to 10 feet, sometimes higher if the heater is stronger or built for taller spaces.
The big thing to remember is this — infrared heaters don’t reward random placement. They reward good aim. Start with the manual, think about where people actually sit or stand, and don’t mount a modest heater so high that the warmth fades before it reaches the target. Get that part right, and the heater won’t just look properly installed — it’ll actually feel right too.