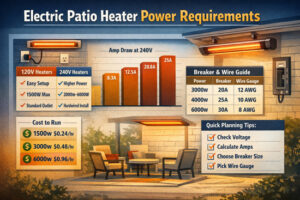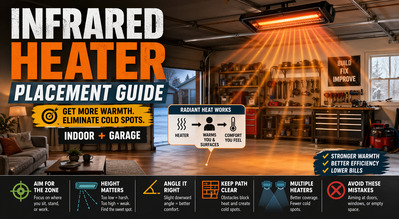
This infrared heater placement guide is here for one reason — a good heater can still feel underwhelming if you put it in the wrong spot. The unit may have enough power, decent reviews, and the right features, but if the warmth feels patchy or weak, placement is often the real problem.
That’s because infrared heat doesn’t work like a typical fan heater that slowly warms the whole air mass. It behaves more like sunlight. It travels in a straight line and warms the people, floor, tools, furniture, and surfaces it reaches first. So where you mount it changes how the heat feels almost immediately.
In plain English, this infrared heater placement guide covers what actually matters indoors and in garages — where to put the heater, how high to mount it, what angle usually works best, and what mistakes can make a solid setup feel disappointing.
Quick verdict — where infrared heaters usually work best
Before getting into the details, here’s the short answer. Infrared heaters usually work best when they’re aimed at the part of the room or garage you actually use most, not just wherever installation is easiest.
| Space | Best placement style | Why it usually works |
|---|---|---|
| Living room | Ceiling-mounted or high wall-mounted near seating | Better warmth where people actually sit |
| Bedroom | High wall-mounted off to the side of the bed | More comfortable than direct face-level heat |
| Home office | Wall-mounted or portable aimed at desk zone | Good direct comfort without heating the whole house |
| Home gym | Ceiling-mounted or high wall-mounted above workout area | Keeps warmth focused where you move and stand |
| Small garage | Ceiling-mounted or high wall-mounted above work zone | Saves floor space and gives cleaner coverage |
| Two-car garage | One or two mounted heaters aimed at main use area | Better than trying to heat every corner evenly |
| Workshop | Mounted above bench or standing area | Puts heat where hands, tools, and floor matter most |
Why placement matters so much with infrared heat
Infrared heaters don’t mainly warm the air first. They warm what the heater can “see.” That’s the whole point.
So if the heater has a clear path to your sofa, your workbench, your treadmill, or the floor where you stand, it tends to feel effective pretty quickly. If it’s aimed at empty walkways, blocked by shelves, or mounted too far from the area you actually use, the result can feel weaker than expected.
A simple way to think about it:
- clear path = better comfort
- blocked path = weaker comfort
- closer target = stronger feel
- farther target = softer feel
That’s why the same heater can feel excellent in one setup and just okay in another. In many cases, the issue isn’t the heater itself. It’s that the heat is being sent to the wrong place.
Infrared heater placement guide for indoor rooms
Indoors, the best setup usually favors the area where people spend time. That might be the sofa zone in a living room, the chair and leg area in a home office, or the treadmill and mat zone in a home gym.
For ceiling-mounted heaters, a central or slightly offset overhead position often works best because it gives broad coverage without focusing all the heat in one tiny spot. For wall-mounted units, a higher position with a slight downward angle usually feels better than mounting too low. That helps the radiant heat land on people and surfaces without getting blocked as easily by furniture.
Try not to aim infrared heaters straight at large windows unless there’s a specific reason to. Glass doesn’t tend to give you the same “stored warmth” feel as walls, furniture, or flooring. In most indoor spaces, it’s smarter to aim at occupied zones and solid surfaces.
Indoor placement cheat sheet
| Room | Good target area | Better placement | Avoid |
|---|---|---|---|
| Living room | Sofa, chairs, coffee-table zone | Ceiling center or high wall with slight downward angle | Aiming at windows or empty traffic paths |
| Bedroom | Side zone near bed | High wall mount, slightly offset | Direct blast at pillow level |
| Office | Desk, chair, leg zone | Wall mount or portable aimed across desk area | Behind monitor or furniture |
| Gym | Treadmill, bench, mat zone | Ceiling or high wall over workout area | Mounting too low where heat feels head-heavy |
One common mistake indoors is choosing the prettiest wall instead of the most useful one. Clean design matters, but comfort matters more. If the heater exists to warm your seating area, that’s the zone it should favor.
Ceiling vs wall mounting — which one usually works better?
This depends more on the space than on the heater category itself.
Ceiling-mounted infrared heaters usually give wider coverage and keep the heater out of the way. They work especially well in garages, gyms, workshops, and open rooms where wall and floor space matter.
Wall-mounted infrared heaters are often easier to direct. They can work really well in narrower rooms or more targeted heating setups where you want the warmth focused on a desk zone, seating area, or one side of a room.
| Mounting type | Best for | Pros | Trade-offs |
|---|---|---|---|
| Ceiling-mounted | Garages, gyms, open rooms | Wide coverage, cleaner layout, frees wall space | Needs enough height to work well |
| Wall-mounted | Living rooms, offices, narrower spaces | Better directional control, often simpler install | Coverage can be narrower |
| Portable/freestanding | Spot heat, flexible use | Easy to move, good for temporary use | Easier to place badly, takes up floor space |
In general, ceiling mounting is better when you want broader spread. Wall mounting is better when you want more targeted comfort.
Infrared heater placement guide for garages
Garage placement is where infrared heaters can really shine — and where bad placement can waste a lot of their advantage.
Garages are full of things that make ordinary heating frustrating: concrete floors, drafts, high ceilings, big doors, storage racks, and a lot of unused air volume. That’s why it usually makes more sense to think in zones instead of trying to heat every square foot equally.
The best garage targets are usually:
- workbench area
- tool wall or standing repair zone
- gym corner
- hobby station
- floor area where you stand most often
| Garage use | Best heater focus | Why it works |
|---|---|---|
| Parking + occasional projects | Main standing/work zone near bench | Better than heating empty car space |
| Full workshop | Bench and central work aisle | Keeps tools, surfaces, and floor more usable |
| Garage gym | Treadmill, rack, or mat zone | Faster comfort where you actually move |
| Drafty garage with frequent door opening | Area away from garage door | Less wasted coverage toward heat-loss zone |
A lot of garages do well with a heater mounted on the ceiling or high on a wall opposite the garage door. That usually gives the heat a better shot at the useful part of the space instead of throwing warmth toward the biggest source of heat loss.
Mounting height, angle, and line of sight
These three things change how the heater actually feels in real life.
Height
Lower mounting usually feels stronger and more immediate, but it covers less area. Higher mounting usually spreads heat wider, but the warmth feels softer.
Angle
A slight downward angle often works better than a flat, shallow setup because it directs the radiant heat toward people, floors, and work surfaces instead of across empty air.
Line of sight
Infrared heat does not wrap around obstacles. Shelves, parked vehicles, cabinets, couches, and stacked boxes can block the radiant path and create cold shadow zones.
| Problem | Likely cause | Better fix |
|---|---|---|
| Heat feels too weak | Mounted too high or too far from target area | Lower within allowed range or refocus toward the use zone |
| Heat feels too harsh | Mounted too low or too direct | Raise slightly or soften the angle |
| One side feels cold | Obstacle blocking radiant path | Re-aim heater or shift placement |
| Floor still feels chilly | Heater aimed too high across room | Angle more toward floor and use zone |
A simple test helps here: stand where you want the warmth most. If the heater has a clear shot at that spot, you’re usually on the right track.
One heater vs multiple heaters
A single heater can work really well in a smaller room or compact garage with one main use area.
But once the space gets larger, longer, draftier, or more divided, two heaters often work better than one oversized unit. That’s because you can overlap warmth where it matters instead of forcing one heater to do all the work from one awkward location.
| Setup | Usually best for | Result |
|---|---|---|
| One heater | Small room, single bench zone, compact gym corner | Simple and cost-effective |
| Two heaters | Two-car garage, long workshop, open-plan room | Better coverage and fewer cold pockets |
| Zoned multiple heaters | Large garages or mixed-use spaces | More control and less wasted energy |
If your space has multiple activity areas, a multi-heater layout is often the smarter move.
Common placement mistakes to avoid
A lot of bad results come from a few repeat mistakes:
- aiming at empty walkways instead of occupied zones
- mounting too high just because it looks cleaner
- mounting too low so the heat feels harsh
- ignoring shelves, furniture, or vehicles blocking the radiant path
- placing the heater where the outlet is easiest instead of where the comfort should be
- expecting one heater to handle a large, drafty garage evenly
| Do | Don’t |
|---|---|
| Aim at seating, standing, or work zones | Aim at empty space just because it’s centered |
| Follow manufacturer clearance rules | Guess on safe distances |
| Use a slight downward angle where appropriate | Mount flat when that leaves heat too shallow |
| Think in zones | Assume the whole room needs equal priority |
| Check for blocked line of sight | Forget that shelves, cars, and cabinets block heat |
Placement examples that usually work well
Home office: A high wall-mounted heater angled toward the desk and leg zone usually feels better than one mounted behind the chair.
Living room: A ceiling-mounted heater above or just in front of the main seating area often feels more natural than a wall unit aimed across a long room.
Garage workshop: A ceiling-mounted or high wall-mounted heater above the bench and standing zone usually beats a setup that tries to heat the whole garage from one far corner.
Garage gym: A heater aimed at the treadmill, rack, or mat zone usually gives faster comfort than trying to warm the entire garage first.
Bottom line
The best infrared heater placement guide advice is pretty simple: aim the heat at the part of the room or garage you actually use. Indoors, that usually means the seating area, desk zone, or workout spot. In garages, it usually means the bench, gym area, or main standing zone rather than trying to heat the whole space equally.
Get the target zone right, keep the line of sight clear, and use the right mounting height and angle for the model. That’s what makes infrared heating feel fast, useful, and worth having. A good heater matters, but smart placement is often what makes it finally click.